
The QuickBooks Desktop application, like any other software program, required regular updates and maintenance to function optimally. Users need to install the latest upgrades and features to access the app and its features, like payroll, with ease. But sometimes, issues might arise while undertaking the update process, which can lead to common 15000 series errors, like QuickBooks error 15240.
The error code can occur while initiating the update process or completing the downloads and can be a result of many common scenarios, some of which include missing file components, incorrect Internet Explorer settings, and Windows firewall obstructions. This error message can disrupt the functioning of the app by preventing users from running the updates successfully. If you encounter QuickBooks error code 15240, you can follow the comprehensive guide below to learn the best solutions to tackle the issue once and for all.
Are you unable to follow the resolution steps provided in this article? Whether you are not tech-savvy or are finding these solutions too challenging to perform, you can always reach out to our team of QB support experts by dialing 1-855-948-3646 to get immediate assistance in resolving the update problems in the app.
Leading Reasons and Possible Factors for QuickBooks Payroll Error 15240
QuickBooks Desktop update error 15240 can arise due to the main causes and primary scenarios mentioned below –
- The file you are trying to open might be used by another program, which can lead to the “file exists” message while running the downloads in QB.
- There are internet connection issues in the app, and the connection might be weak, unstable, or unreliable while trying to download the latest updates for QuickBooks and payroll.
- You are not running QuickBooks with proper admin privileges while downloading the updates, and the current user account might not have adequate access.
- Your system’s date and time settings might be incorrect or set to another time zone, which can prevent users from downloading the recent updates and features.
- The Internet Explorer settings might be incorrect or misconfigured, which can prevent users from properly accessing the Internet while running the updates.
- The Windows firewall or an anti-virus program in your PC might be incorrectly set to block QuickBooks or cause obstructions in the update process.
- QuickBooks Desktop might not be able to verify the digital signature while downloading updates, and the signature certificate might be unavailable or expired.
- Some essential files or components might be missing while running the QB update process, which can lead to 15000 series errors.
- You are running QuickBooks in a multi-user mode with terminal service settings while running the updates, which can cause access issues.
- The payroll subscription might be expired or inactive, and the service key might be incorrect while downloading the payroll updates.
Detailed Solutions to Easily Rectify QuickBooks Maintenance Release Error 15240
You can successfully remove QuickBooks update error 15240 to run the upgraded QB version with ease by performing the effective solutions mentioned below –
Step 1 – Run QuickBooks with Admin Privileges and Re-Download the Updates

You need to ensure that the update process is running with proper admin rights by following these steps –
- Close the company files and exit QuickBooks, then right-click the QB icon on your desktop to choose the Run as Admin option.
- Select Yes when the system asks you to allow the program to make the changes, and once done, launch QuickBooks and go to the Help section.
- Select the Update QuickBooks Desktop option and reset the updates from the Update Now window to check the status of the 15240 error code
Step 2 – Add Windows Permissions to the QB Installation Folders from the Advanced Security Tab
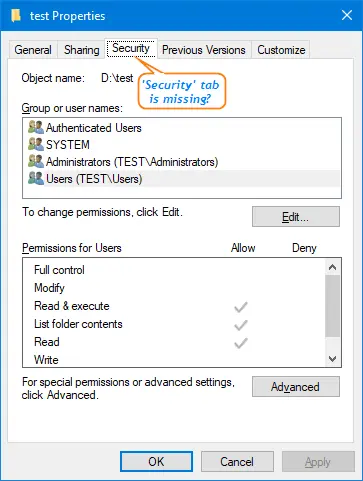
Providing proper Windows permissions to the installation folders can help resolve QuickBooks error message 15240.
- Exit QuickBooks and access the Program Files menu of the C Drive to locate the Intuit folder.
- Next, right-click the folder name and choose Properties, followed by selecting the Advanced option from the Security menu.
- Ensure that the Owner option is set to Users, and if not, you need to edit the ownership in the following manner –
- Select Change from the Advanced Security Settings window and type Users in the Object Name field, then select Check Names.
- Hit OK and checkmark the Replace Owners on Subcontainers and Objects option, followed by hitting Apply and OK.
- Lastly, select Users from the Permissions window and click the Full Control option, then hit Apply to save the changes.
- Now, try downloading the QB updates again, and if the error persists, repeat the above steps by navigating to the following folders –
- C:\Program Files\Common Files\Intuit
- (64-bit users) C:\Program Files (x86)\Common Files\Intuit
- C:\ProgramData\Intuit
- C:\Users\Your User Name\AppData\Local\Intuit
Step 3 – Review the Internet Explorer Settings and Modify the SSL Options
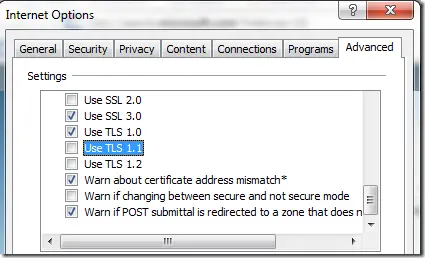
Issues while updating QuickBooks can arise when the Internet Explorer settings are misconfigured, which can be fixed by editing the SSL setup.
- Exit QuickBooks and open Internet Explorer to choose the Gear icon from the Tools section.
- Next, select Internet Options and navigate to the Advanced tab to access the Security menu, followed by marking the Use SSL 2.0 option.
- Ensure that the Use SSL 3.0 option is checkmarked and hit Apply and OK to save the changes, followed by rerunning QuickBooks.
Step 4 – Edit the Advanced Firewall Setup to Allow QuickBooks without Blockages
You can troubleshoot QuickBooks error code 15240 by modifying the Windows firewall settings to remove blockages while running the update process.
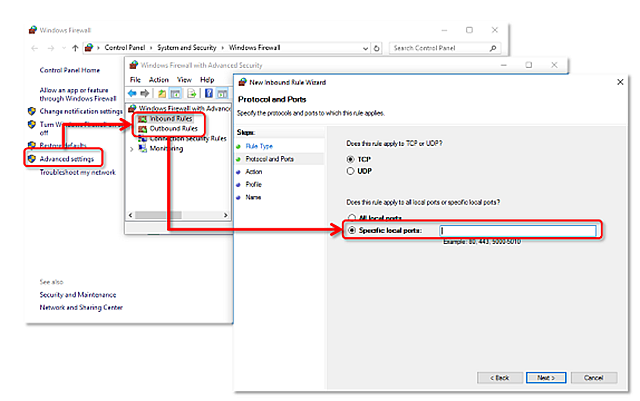
To add firewall port exceptions –
- Search for Windows Firewall in the Windows Start menu and open the utility to select Advanced Settings.
- Right-click the Inbound Rules option and choose New Rule, then select the Port option and ensure that the TCP option is checkmarked.
- Enter the specific port in the Local Ports field as per your QB version from the following port options and ensure that ports 80 and 443 are not disabled.
- QuickBooks Desktop 2020 and later: 8019, XXXXX.
- QuickBooks Desktop 2019: 8019, XXXXX.
- QuickBooks Desktop 2018: 8019, 56728, 55378-55382.
- QuickBooks Desktop 2017: 8019, 56727, 55373-55377.
- After entering the number, hit Next and select the Allow the Connection option, followed by hitting Next again.
- Mark all the given profiles if prompted, then select Next to name the new rule as QBPorts(year) and select Finish.
- Now, create Outbound Rules in the same manner, and once done, download the QB updates again to ensure that the 15000 series error is dismissed.
To add exceptions for executable files –
- Access the Advanced Settings option of Windows Firewall and right-click the Inbound Rules to create a new rule.
- Select the Program menu and click on This Program Path, then choose Browse and select one of the executable files.
- Hit Next and choose Allow the Connection, followed by marking all the profiles and naming the rule as QBFirewallException(name).exe.
- Lastly, create Outbound Rules for the executable files and reopen QuickBooks to run the update process again.
Step 5 – Verify the Date and Time Settings and Edit Them on Your PC
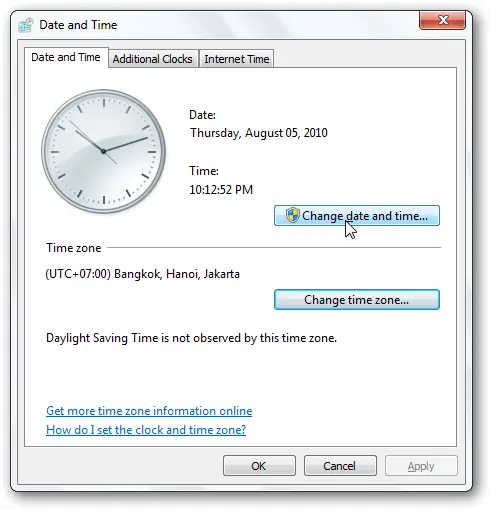
You need to ensure that the date and time on your Windows is correctly set before running the update process.
- Right-click the Date/Time icon on the bottom right corner of the Taskbar and choose the Adjust Date and Time option.
- Click on Change Date and Time Settings and select the correct date and time, then hit Apply and OK to save the changes.
Step 6 – Reinstall QuickBooks Desktop to Repair Program Issues
You need to follow the detailed process below to remove and then reinstall the QB app.
- Firstly, ensure that the current QuickBooks installer version is downloaded on your Windows OS.
- Next, have your license info and product details ready to run the registration process seamlessly.
Remove and Reinstall QuickBooks –
- Open the Windows Start tab to access the Control Panel and choose the Programs and Features section to access the program list.
- Select QuickBooks from the given programs and hit the Uninstall/Change option, followed by selecting the Remove button.
- Hit Next and proceed to install QuickBooks by downloading the QuickBooks.exe file from Intuit and accepting the software license agreement.
- Once done, enter your product details and license number and hit Next to decide the installation path.
- Select Express if you are using QB as a single user and select Customer if you are using QB in a multi-user mode, then choose the Install button and let the process complete.
If the update problems keep occurring, you can try renaming the installation folders.
Manually uninstall QuickBooks and rename the installation folders –
- Remove QuickBooks by performing the steps above, then open the Windows File Explorer from the Start tab.
- Open the QuickBooks Installation Folder from the Program Files section of the C Drive and right-click the folder name to choose the Rename option.
- Lastly, add OLD to the file name and hit Enter to prevent QuickBooks from opening the folder during the reinstallation process.
Step 7 – Access the Program Problems Tab to Run an Application Repair from the Tool Hub
The QuickBooks Tool Hub utility provided by Intuit can help resolve many common internal issues. You can learn the application repair process by accessing the Quick Fix My Program feature in the following manner –
- Download the QuickBooksToolHub.exe setup file from Intuit’s website and follow the on-screen prompts to install the utility and access the license agreement.
- Next, open the tool hub by double-clicking the icon and go to the Program Problems section to select the Quick Fix My Program option.
- Run the tool to detect and repair common application problems, and once the tool stops running, re-launch QuickBooks and download the latest updates.
Step 8 – Install the Digital Signature Certificate by Modifying the QBW32.EXE File Properties
Problems while updating QuickBooks can be fixed by ensuring the digital signature certificate is correctly installed.
- Choose the Program Files folder from the C Drive of your PC and right-click the QBW32.EXE file to choose Properties.
- Next, ensure that Intuit is selected in the signature list of the Digital Signature tab, then hit the Details button.
- Select View Certificate from the Details window and navigate to the Certificate window to choose Install Certificate.
- Lastly, hit Next and Finish to end the process and restart your PC to rerun the payroll update process in QuickBooks.
Step 9 – Manage the Subscription and Edit the Service Key from the Employees Menu
You can tackle the payroll update problems by ensuring that the subscription is active and the service key is correct in the employees’ section.
To reactivate the subscription –
- Open the QuickBooks Employees menu and select the My Payroll Service section, then go to the Account/Billing Info tab to sign in.
- Once the QuickBooks Page opens, go to the Status section and select Resubscribe, then follow the given prompts to reactivate payroll and rerun the update process.
To manage the service key –
- Open QuickBooks and go to the Employees section to choose the My Payroll Service option, then select the Manage Service key button.
- Next, review the service key, and if it is incorrect, select the Edit option and enter the correct service key, followed by hitting Next to save the changes.
Step 10 – Download QB Updates in Safe Mode to Prevent Background Interruptions
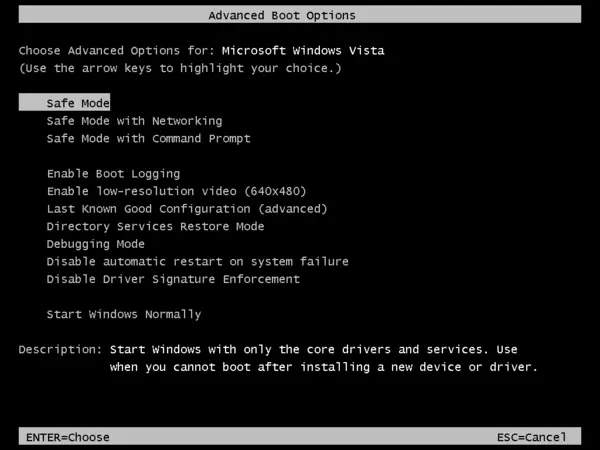
If none of the above solutions are working, you can activate the Windows safe mode to run the QB update process.
- Open the Run window and type the CMD command in the box, then type MSConfig in the new window and hit Enter.
- Select Selective Startup from the General section and click on Load System Services, then uncheck the Load Startup Items checkbox.
- Select the Hide All Microsoft Services option from the Services tab, then select Disable All to clear all the selected services.
- Unmark the Hide All Microsoft Services option and verify that the Windows Installer checkbox is selected, followed by hitting OK and restarting your PC.
- Once the Windows runs in the Safe Startup Mode, download the latest updates and maintenance releases for QuickBooks and switch back to the Normal Mode from the Boot Options tab.
Step 11 – Terminate Essential QB Processes from the Details Tab of the Task Manager Window
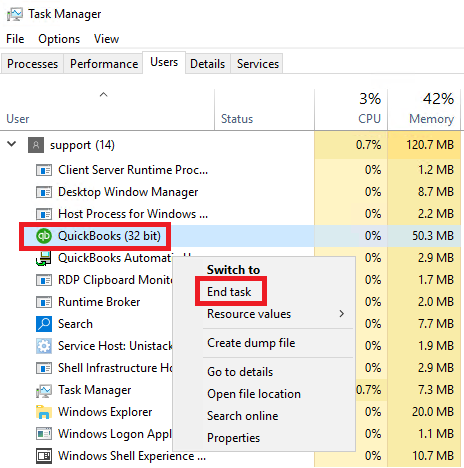
You can address the update issues while running QuickBooks by deleting the EXE processes before running the update process.
- Exit QuickBooks and right-click the Taskbar to choose the Task Manager window, then navigate to the Details tab.
- Look for the following QuickBooks processes and right-click each one of them to choose the End Task option, followed by rerunning the update process.
- QBW32.exe or QBW.exe
- QBCFMonitorService.exe
- qbupdate.exe
- QBDBMgr.exe or QBDBMgrN.exe
- QBMapi32.exe
Conclusion
QuickBooks error 15240 is a common part of the 15000 series that can be easily rectified by performing the resolution steps given in this guide. If you have undertaken all these detailed solutions, and the error continues to appear, you can reach out to our team of QB professionals at 1-855-948-3646 to get direct guidance to address the update issues.
FAQs
What is error 15240 in QuickBooks Desktop?
QuickBooks error 15240 is an update issue that arises while downloading the updates and maintenance releases for the app or the payroll function. This error can make the update process unsuccessful, which can prevent users from accessing the latest features.
What are the common symptoms of QuickBooks error 15240?
QuickBooks error 15240 can have the following common signs and symptoms –
- Your payroll update process keeps failing even after multiple tries.
- You are unable to run essential payroll functions in QuickBooks.
- QuickBooks is facing performance issues, which can affect the system and lead to frequent crashes.
How can I update QuickBooks Desktop?
You can update QuickBooks Desktop by accessing the Help menu and choosing the Reset Updates option from the Update Now window. Once the updates are downloaded, you can install them by rerunning the app and choosing the Install Now button.
What are the causes behind the QuickBooks 15240 error?
QuickBooks error 15240 can arise due to the following scenarios –
- You are not logged in as a Windows admin.
- The digital signature certificate is outdated or incorrectly installed.
- The Internet Explorer settings might be misconfigured for QuickBooks.
- There are firewall blockages while downloading the updates.
How can I fix QuickBooks update error 15240?
QuickBooks error 15240 can be resolved with these easy steps –
- Fix the Internet Explorer security settings.
- Remove firewall blockages by creating ports for QuickBooks.
- Install the digital signature certificate by editing the QBW32.exe file properties.
- Ensure that the system’s date and time settings are correctly set while running the update.