QuickBooks error code 12031 mainly develops when the software fails to establish a stable connection with the Internet. All the accounting tasks requiring an internet connection suffer due to this error, but a significant concern arises when the payroll or QuickBooks Desktop updates can’t be downloaded to your system. Whenever you begin the updates, you’ll see QuickBooks Error 12031 come up on the screen and terminate the update process instantly. In case you are dealing with this connectivity issue on your QuickBooks, go through this entire blog to figure out why the error develops and the methods needed to eliminate it from your system.
Failure to update payroll and QuickBooks can prevent you from using new features and other enhancements added by the developer team. To avoid any problems during the updates, contact our team of QB professionals at 1-855-948-3646 for best-in-the-industry troubleshooting assistance.
Why do you Encounter Error 12031 when Updating QuickBooks?
We all know that QuickBooks Desktop must remain connected to the Internet while performing accounting tasks to ensure a smooth data exchange with the Intuit servers. Any issues or hindrances in the network connection might lead to the failure of the accounting tasks and the occurrence of error messages in QuickBooks, especially while downloading the latest updates. Network connectivity issues might damage the Update package during download, which raises issues when you try installing them in your QuickBooks. We have compiled the possible reasons that cause the connectivity issues to develop and interrupt the payroll or QuickBooks updates on your system. Check them below-
- Misconfigured Internet settings (TLS & SSL) might stop QuickBooks from accessing the Internet during payroll updates.
- Windows Defender Firewall or other antiviruses can restrict QuickBooks from connecting to the servers or other systems.
- Incompatible web browsers or excessive junk files in the browser can also hinder network connections.
- QuickBooks might be internally damaged due to missing or damaged program files after a partial software installation.
- The security settings on your Windows do not allow QuickBooks to set up an internet connection, considering it unsafe for your system.
- QuickBooks might develop issues running if it doesn’t have the proper admin permissions to access the Internet or system files.
- Incorrect timings on your system clock might hinder the connection between QuickBooks and the Intuit servers.
- Power management settings can also limit QuickBooks functions if not set appropriately.
These are all the possible conditions that cause network issues on your system and trigger QuickBooks error message 12031 while downloading the payroll or software updates. Now, let’s move further to learn about the techniques that’ll help you fix all connectivity issues affecting the updates.
Simple Methods to Eliminate QuickBooks Update Error 12031
You now know the reasons why payroll and QuickBooks updates fail on your system even after several attempts. QuickBooks Payroll error 12031 emerges as soon as the software loses its connection with the internet and stops the accounting tasks (including updates) instantly. After learning about the triggers of the issue, it is understood that you have to only fix the network connectivity issues on your system. Once all the network connectivity issues are resolved, there are no other conditions that can trigger the payroll update error on your QuickBooks. Let’s begin the troubleshooting with some accurate techniques shared by QB experts-
Solution 1- Adjust the SSL & TLS Settings on your Windows
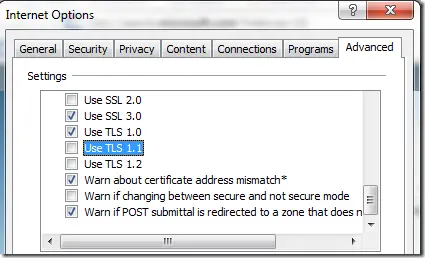
- Open the Run command (Windows + R) and clear the auto-filled text.
- Type ‘inetcpl.cpl’ and hit Enter to go to the Internet Properties window.
- Go to the Security tab and click the Globe icon to set the security level under Medium-high.
- Single-click the Connections tab and select ISP if you use a dial-up node and Never Dial a connection if you don’t.
- Tap Ok and ensure that the automatically detect settings option is selected in the LAN settings.
- Ensure that Use a Proxy Server checkbox must not be marked.
- Move to the Advanced tab and move down the settings list to locate TLS checkboxes.
- Select Use TLS 1.2 among all the TLS settings and click OK to save the changes.
- Relaunch your QuickBooks Desktop and download the updates.
If the payroll or software updates are still blocked, check out the next solution.
Solution 2- Let QB Desktop Bypass the Windows Firewall Restrictions
Windows Firewall and other security software might restrict QuickBooks from accessing the Internet to perform its functions. Although the restrictions are imposed only for your system’s safety, they can sometimes create problems while downloading the latest updates. So, you need to configure the Windows Firewall settings on your system to make sure QuickBooks has full access to the Internet while updating the payroll service. This can be done by adding specific Firewall ports for QuickBooks as shown in the following steps-
Step 1- Add Specific Firewall Ports for QuickBooks Desktop
- Go to the Windows Defender Firewall settings using the Control Panel.
- Click the Advanced Settings option and right-click the Inbound Rules option.
- Tap New Rule and select the Port option.
- Click Next and select the TCP option in the following window.
- Go to the Specific Local Ports field and fill in the port number according to your QB version. Use this list-
- QuickBooks Desktop 2017: 8019, 56727, 55373-55377
- QuickBooks Desktop 2018: 8019, 56728, 55378-55382
- QuickBooks Desktop 2019: 8019, XXXXX
- QuickBooks Desktop 2020 and newer versions: 8019, XXXX
Note: If you use QuickBooks Desktop 2019, 2020, or newer versions, use these steps to find the dynamic ports- - Launch QuickBooks Database Server Manager and go to the Port Monitor tab.
- Find your QB version and note the Port Number adjacent to it.
- Click Next after the Port Numbers are entered and select Allow the Connection.
- Tap Next and ensure all the profiles are marked in the prompted window before clicking Next.
- Create a new rule and assign it any preferable name like “QBPorts(year).”
- Tap Finish once done.
- You’ll have to repeat this procedure after selecting Outbound Rules instead of Inbound Rules and then try downloading the QuickBooks Desktop updates.
Step 2- Create Windows Firewall exceptions for QB Executable Files Individually
QuickBooks has several executable files that make accounting tasks possible. You must create exceptions for each executable file individually to prevent the Windows Firewall from blocking them. Here’s how-
- Open the Windows Defender Firewall settings window and click the Advanced Settings option.
- Right-click Inbound Rules and click the New Rule option.
- Tap Next after selecting Program and then This Program Path.
- Click Browse and select one of the executable files mentioned in the table below-
| Executable files | Location |
| AutoBackupExe.exe | C:\Program Files\Intuit\QUICKBOOKS YEAR |
| Dbmlsync.exe | C:\Program Files\Intuit\QUICKBOOKS YEAR |
| DBManagerExe.exe | C:\Program Files\Intuit\QUICKBOOKS YEAR |
| FileManagement.exe | C:\Program Files\Intuit\QUICKBOOKS YEAR |
| FileMovementExe.exe | C:\Program Files\Intuit\QUICKBOOKS YEAR |
| QuickBooksMessaging.exe | C:\Program Files\Intuit\QUICKBOOKS YEAR |
| QBW32.exe | C:\Program Files\Intuit\QUICKBOOKS YEAR |
| QBDBMgrN.exe | C:\Program Files\Intuit\QUICKBOOKS YEAR |
| QBServerUtilityMgr.exe | C:\Program Files\Common Files\Intuit\QuickBooks |
| QBCFMonitorService.exe | C:\Program Files\Common Files\Intuit\QuickBooks |
| QBLaunch.exe | C:\Program Files\Common Files\Intuit\QuickBooks |
| QBUpdate.exe | C:\Program Files\Common Files\Intuit\QuickBooks\QBUpdate |
| IntuitSyncManager.exe | C:\Program Files\Common Files\Intuit\Sync |
| OnlineBackup.exe | C:\Program Files\QuickBooks Online Backup |
- Click Next after selecting the executable file and select Allow the connection in the next window.
- Tap Next and ensure all the user profiles are selected in the next tab.
- Click Next.
- Create a new rule and give it a preferable name “QBFirewallException(name.exe).”
Repeat all these steps again after selecting Outbound Rules instead of Inbound Rules.
Step 3- Ensure QB files aren’t Blacklisted by the Antiviruses
If you have additional security programs on your PC other than Windows Firewall, you must check their quarantined or blacklisted programs section to remove QB executable files from the list. QuickBooks might face problems running or accessing the Internet if its executable files are blocked. You can check the official website of the respective antiviruses to learn how to remove programs from the blacklist. If you still face problems, we’ll advise you to turn off your antiviruses while downloading QB payroll or software updates.
If QuickBooks error 12031 appears after fixing the Windows Firewall and antivirus settings, go for the next solution.
Solution 3- Reset QB Updates and Check the Shared Download Location
You can also encounter error 12031 QuickBooks if the Payroll Update package incurs damage during the download and fails to extract on your system later. Another condition for the development of the error can be an incorrect shared download location specified in QuickBooks. The payroll or software update will instantly terminate if the Shared Download location is incorrect or inaccessible to QuickBooks. You can resolve this problem by resetting the previous updates on your QB and downloading them again to the correct location. Use these steps-
Tip: You can always check your QB/payroll version and see if a new update is available by opening the Product Information Window (F2).
- Launch your QuickBooks Desktop and access the Help menu.
- Select the Update QuickBooks Desktop option (Do not click the Update Available option on the status bar).
- Go to the Options tab and check the Shared Download location for any issues.
- Move to the Update Now tab after entering the correct shared download location and select the Reset Updates checkbox to delete all the previous updates.
- Select the Mark All checkbox to update the payroll service along with the software and click Get Updates.
- If the updates are successfully downloaded, reboot the software and click Install Now in the software prompt.
Stop Background Tasks of QuickBooks Desktop
In case you are able to download the updates but the release number doesn’t change on your QuickBooks, use these steps-
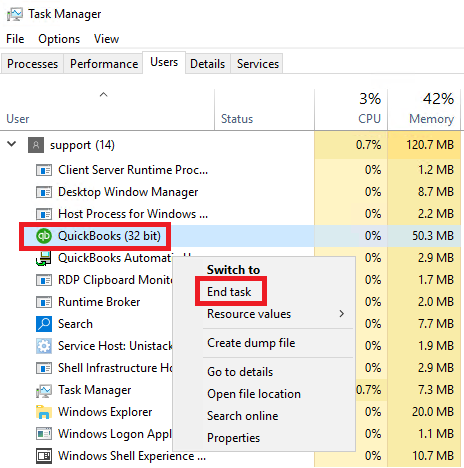
- Press Ctrl + Shift + Esc altogether to launch the Task Manager window.
- Go to the Details tab and click End Task after selecting all the following processes individually-
- QBW.exe or QBW32.exe
- QBUpdate.exe
- QBDBMgr.exe or QBDBMgrN.exe
- QBMapi32.exe
- QBCFMonitorService.exe
After stopping all the above executable files from running, you can try downloading the latest updates directly from the QuickBooks website.
If this technique doesn’t work and you still encounter an error, jump to the next solution.
Solution 4- Rectify Web Browser Issues
Error 12031 updating QuickBooks also develops if the software fails to integrate with your Windows default web browser. This can happen if you have downloaded the Web Browser from a third-party source and it is incompatible with QuickBooks. Intuit always recommends using the supported browsers (Google Chrome, Mozilla Firefox, Safari, etc.) or built-in OS Browsers (Microsoft Edge, Internet Explorer) for the best compatibility with QuickBooks. You must check the Web Browser settings in your Windows and set a QB-compatible web browser as the default browser for your Windows. Use these steps-
- Open the Control Panel and click the Apps option in the menu.
- Select the Default Apps option and search for Internet Explorer or Microsoft Edge (You can also choose other supported web browsers)
- Single-click the web browser name and click Set Default adjacent to the Make (Browser Name) your default browser option in the next window.
- Close the Settings window once the settings are saved.
Clear Browsing History and Junk Files from the Web Browser
QuickBooks can also run into problems during the updates if the network connection is hindered by unnecessary junk files stored on the web browser. You might also struggle to toggle between websites due to excessive cache and cookies already stored in the browser. You must delete them all to prevent problems during QB updates-
- Launch your web browser and go to the Browsing History menu (Ctrl + H in some web browsers).
- Click the Clear Browsing data option and mark the checkboxes for Cookies and other site data, Cached images and files, Passwords and other sign-in data, etc.
- Tap Clear Data to remove all the unnecessary junk files from the browser.
If you still face problems updating the payroll or QuickBooks Desktop, move to the next solution.
Solution 5- Add Intuit as a Trusted Site in the Web Browsers
QuickBooks Desktop Update error 12031 develops if a stable connection to the Internet cannot be established due to incorrect security settings. The security settings are for your system’s safety and can instantly break a connection if it seems harmful. QuickBooks won’t be able to download the updates if the Security settings don’t allow a connection with Intuit or other related sites. You can go around the issue by adding Intuit as a trusted site on your web browsers. We have mentioned the steps to adjust the security settings on some of the commonly used web browsers-
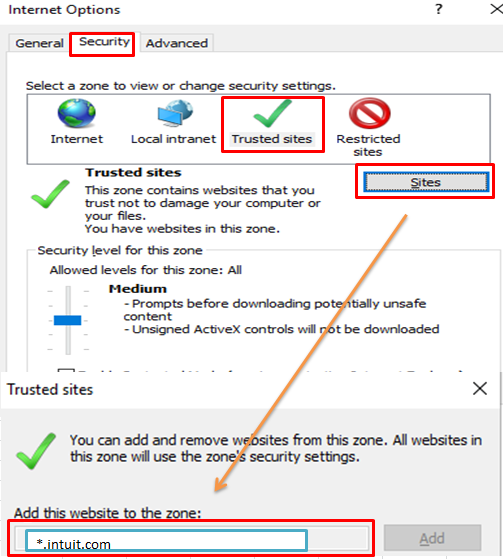
For Google Chrome
Apply the following steps to add Intuit as a trusted site in Google Chrome-
- Click the Customize and Control Google Chrome ⋮ (Vertical Ellipsis) icon on the top right and click Settings.
- Click the Privacy and Security option and select Site Settings.
- Tap the Third-Party Cookies option and select Add in the Allowed to use third-party cookies section.
- Type *.intuit.com and click Add to save.
For Safari
If you are a MAC user, apply these steps to set Intuit as a trusted site on your Safari-
- Launch Safari and enter *.intuit.com.
- Hit Enter and select the Bookmarks option.
- Click Add Bookmark… and select Add this Page to: from the drop-down.
- Select Favorites and tap Add.
For Microsoft Edge
Use the following steps to add Intuit as a trusted site in Microsoft Edge-
- Click the … (Ellipsis) icon and select Settings.
- Select the Cookies and Sites permissions option on the left menu and tap Manage and delete cookies and site data.
- Click Add in the Allow section.
- Type *.intuit.com and hit Add.
Move to the next solution if the update issue persists.
Solution 6- Using QuickBooks Tool Hub to Rectify the Update Issues
QuickBooks error message 12031 can also appear on the screen if the payroll update is hindered by internal issues in the software. QuickBooks can malfunction or fail to perform its functions smoothly if technical glitches stop its background processes or create problems when it tries connecting to the Internet. QuickBooks Tool Hub is a one-stop solution because of the automated tools it provides to counter the internal issues in the software. Here’s the procedure to download and use QuickBooks Tool Hub effectively-
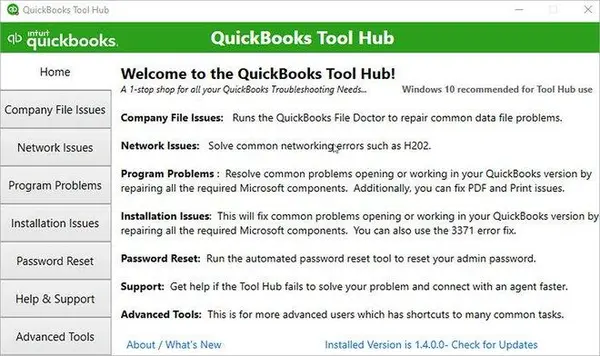
- Visit the official QuickBooks website and navigate to the Downloads and Updates page.
- Enter the details of your QB product and download the latest QuickBooks Tool Hub version (1.6.0.3) available.
- Open the QuickBooksTooHub.exe file after downloading and install the program on your system using the on-screen instructions.
- Let the installation complete and then proceed to use the automated tools.
Using TLS 1.2 Readiness Tool
The TLS 1.2 Readiness Tool helps to make you make your OS TLS compliant. We tried configuring the TLS settings earlier in this blog, but this tool makes things easier by automatically diagnosing and sorting the problems. Refer to these steps-
- Open the QB Tool Hub and click the Installation Issues menu,
- Select the QuickBooks TLS 1.2 Tool option (Bottom right) and tap Ok to run it.
- Click Yes to the EULA Agreement and tap Run.
- Tap Exit after the Tool stops running.
Using Quick Fix My Program Tool
The Quick Fix My Program Tool helps you rectify internal issues in the software, such as damaged or corrupt program files. It also removes minor glitches that can harm the software’s performance. Use these steps-
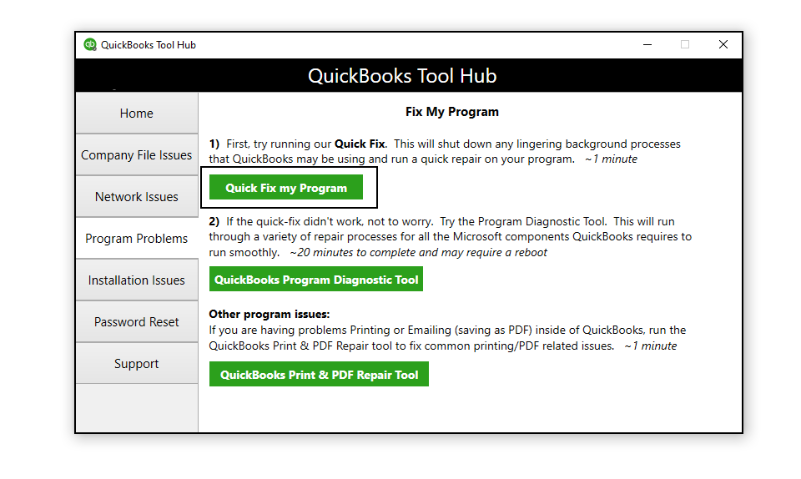
- Open the QB Tool Hub and click the Program Problems menu.
- Select the Quick Fix My Program option and run the tool as per the directions given on the screen.
- Wait patiently until the Tool completes the repair.
Using Quick Fix My File
You might sometimes encounter Error 12031 updating QuickBooks if the company file is in bad shape and has become unreadable for the software due to damage. QuickBooks Tool Hub can help you repair the company file and make it usable for QuickBooks again. Perform these steps-
- Run the QuickBooks Tool Hub application and click the Company File Issues menu.
- Select the Quick Fix My File option in the drop-down and wait until the tool completes.
- Go to the Company File Issues menu again and select the Run File Doctor Tool option.
- Hit Browse to specify your company file location and select the Check your file option.
- Enter your admin credentials if prompted and wait until your company file is completely.
After you run all these Tools, open your QuickBooks Desktop and try downloading/installing the updates. If error messages cover your screen again, move to the next solution.
Solution 7- Configure Power Management Settings and System Clock
You might see QuickBooks error message 12031 during payroll or the software update if your computer’s power management settings aren’t correctly configured. As you know, running the system in power-saving mode limits the use of system resources for the applications. QuickBooks can struggle due to it if it cannot use the required RAM or access the program files required to download the payroll updates. Apply the following steps to disable the power management settings on your computer-
- Single-click the search panel and type ‘Power options.’
- Open the Power Management Settings window from the search results and ensure that sleep, standby, hibernation, and power-saving modes are turned off.
- Save the settings.
Adjusting the System Clock
You might find it awkward but incorrect timings on your system clock is also a possible trigger for QuickBooks Payroll Error 12031. If you are wondering why, Intuit servers and some websites try to sync the timings with the system clock when you download the software/payroll updates or open a web page. In case there’s a mismatch between the original timings and your system clock, the connection is instantly terminated. To prevent this from happening on your system, apply the following steps-
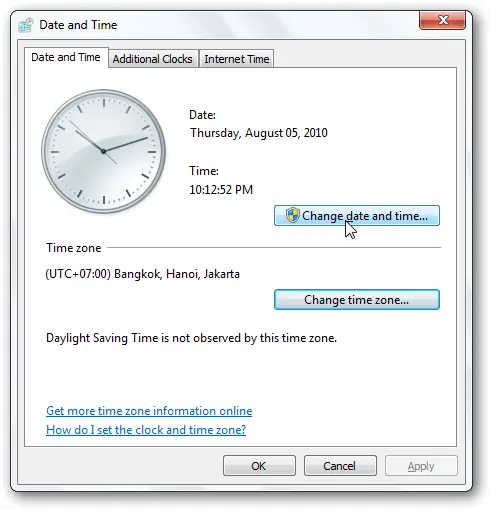
- Right-click the system clock on the bottom right of your screen (on the Taskbar).
- Select the Adjust date and time option and click the Set Time automatically option in the window that opens.
- You can also set the timings manually if preferred.
These are some of the techniques that you must use if you are unable to update QuickBooks error 12031. Some quick fixes for resolving the network connectivity issues include checking your Internet Speed, plugging out and plugging in your router, sorting out hardware damage issues, updating Windows OS, and running QuickBooks in Admin mode during updates.
Summary
This blog will make you cognizant of QuickBooks error 12031, which mostly appears during software or payroll updates due to network connectivity issues. The blog, in detail, describes the causes of the issue and the elimination techniques that effectively remove it from QuickBooks. If you read the blog thoroughly and encounterd problems, give us a call at 1-855-948-3646 to engage our team of QB professionals in the rectification of this issue from your system ASAP!
FAQs
What is error code 12031 in QuickBooks?
Error code 12031 in QuickBooks signifies that the payroll or software update cannot be completed as network connectivity issues have hindered the process. Any interruption in the Internet connection during the updates can trigger this error, which you must quickly resolve to install the latest updates in your QuickBooks.
Why I am getting error code 12031 updating payroll and how to fix it?
A sudden lapse in your Internet connection is the reason you encounter QuickBooks error 12031 while updating the payroll or software itself. To eliminate the error, you need to resolve all the network connectivity issues on your system that can hinder the Internet Connection while downloading the latest updates. It involves configuring the TLS settings, turning off antiviruses, and fixing web browser issues on your system.
QuickBooks Error Code 12031 appeared when I tried to download the latest tax table updates. Is my payroll data damaged?
No, your payroll data won’t be affected by QuickBooks Error Code 12031. This error mainly appears on the screen when the update process can’t continue due to a lack of a stable internet connection. You don’t have to worry about your financial data, as the error is eliminated as soon as you sort out the issues bothering the Internet connection.